

Are you a Minecraft player who wants to know how to allocate more RAM for Minecraft? If so, this blog post is for you that will help you to allocate more RAM to Minecraft.
Minecraft is a game that was created in 2009 by Markus Persson, also known as Notch. In the game, players mine and craft various objects from a variety of materials. You can use these items to survive in the world of Minecraft or to craft amazing structures.
Minecraft runs well on almost every platform provided that there is enough RAM available.
If your computer doesn’t have enough RAM, you’re likely to experience crashes, stuttering, and other similar issues, making the game almost impossible to play.
Therefore, make sure your Minecraft server has enough RAM. As a result of this allocation, two things will happen: either it will postpone the crash, or it will completely prevent it from helping you play your game without any further hindrance.
Also, Read: 20+ Minecraft Console Commands and Cheat Codes

In today’s article, I’m going to tell you how to allocate more RAM for Minecraft.
Without further ado, let’s get started!
How Much Ram Is Needed For Minecraft?
You’ll have to decide depending on your application. For vanilla gameplay without mods, roughly 2 gigabytes (GB) of memory is needed. You should consider increasing the RAM to 4GB or 6GB if you plan to use a lot of mods.
It is recommended that a player has at least 2 (GB) of RAM available to play Minecraft. Make sure that you do not take more RAM than your computer actually has available.
Also, Read: How to Find Buried Treasure in Minecraft (the Easy Way)
How To Check Your RAM?
If you want to adjust the RAM allocation settings for Minecraft, you must first identify how much RAM your computer has. It isn’t possible for you to allocate more RAM to your game than you have available on your computer.
Do not worry, finding out how much RAM your computer has is simple. There are two ways to check the amount of RAM in your system. To check the RAM capacity of your computer follows these steps:
- Press Windows key + X (or Pause/Break) to open the System window.
- Look for the Systems category in the window, which should be the first option.
- At the bottom of the list, click on the About option.
- On this page, you will find all the information you need for your computer and Windows OS.
- There is a section at the top of the screen called Device specifications where you can see the installed RAM capacity.

Another method is that you can use the task manager. On the task manager, click on the Performance tab, then click on Memory. In this section, you can check how much RAM is used by your system so you know how much RAM is left for Minecraft.
It is important to check how much RAM your system is currently using before determining how much RAM you can allocate.
Also, Read: How to Install Mods in Minecraft Using Simple Steps
How To Allocate More RAM For Minecraft?
After you know how much RAM you need for Minecraft and how much you have spare, let’s discuss how you can allocate more RAM.
You must follow these instructions carefully to allocate the RAM without damaging the game installation.
Allocate RAM Using The Default Launcher
You can allocate more RAM to the game itself by using the default Minecraft Launcher. Here is how can do so:
- First, open the Minecraft launcher and choose the version you usually play (Bedrock or Java).
- Next, select the right release of the game from the list of Installations at the top of the window.
- Click on the three-dot icon on the right to access more options after you have selected the right game version.
- Now, from the additional options, select Edit. A new window will open that contains many additional settings.
- Afterward, click on the More Options and scroll down to the JVM Arguments field.
- In the field, you will need to make a small change. If you wish to allocate more RAM for the game, simply change the “1” in the “-Xmx1G” to the number you wish.
- In this command, “1” represents 1 GB RAM. To allocate 2 GB of RAM to Minecraft, use the command “-Xmx2G“.
- And -Xmx4G means you are allocating 4GB to Minecraft.

- Click the green Save button once you have made the change.
Also, Read: How to Get Minecraft on Chromebook?
Allocate RAM Using The ATLauncher
The ATLauncher is probably familiar to you if you play Minecraft with a number of creative mods.
While it isn’t the default launcher, it still allows you to edit game files and allocate more RAM directly from the launcher. Here’s how to do it:
- First, launch the ATLauncher and go to the settings tab from the right panel.
- Now, at the top of the window, click the Java/Minecraft tab.
- After you have done that, you will be able to see some additional options. Choose Maximum Memory/RAM.
- To adjust the RAM allocation for the game, you can simply use the directional arrows.
- You can also directly type how much RAM you want to allocate for Minecraft. Make sure you enter the value in megabytes (MB).
Note: Keep in mind that you need at least 4096MB.

- Click Save to save your changes.
It will allocate Minecraft the memory you choose so you can play Minecraft in the most efficient manner possible.
Allocate RAM Using The Technic Launcher
Like the ATLauncher, the Technic Launcher is a popular launcher used to install heavy mods for Minecraft. With its user-friendly interface, you can customize a lot of settings before you begin playing the game.
Follow these steps to allocate more RAM to Minecraft using the Technic launcher:
- Open your Technic Launcher and then click on Settings in the top-right corner.
- Click on the Java Settings tab once you are in the settings.
- Here you will see a drop-down menu with the Memory tag. Just click on it and choose the memory allocation you want.

Note: Remember that for modded gameplay, you will need at least 4GB of RAM.
- The changes will be saved automatically. Before closing Technic Launcher, wait a few seconds to be sure.
Allocate RAM Using The Twitch Launcher
Another popular Minecraft launcher is Twitch, which is known for its mod support. There are a lot of settings users can adjust, including RAM allocation, without having to go through any complicated processes. Here’s how to do it:
- Firstly, open the Twitch Launcher and then click on the three lines at the top right of the screen.
- It will take you to Files, where you can access the Settings menu (as a gear icon).
- From the Settings menu, click on Minecraft.
- After that scroll down and navigate to the Java Settings section.
- In the Java Settings section, look for the Allocated Memory slider. You will be able to change the RAM allocation once you find it.
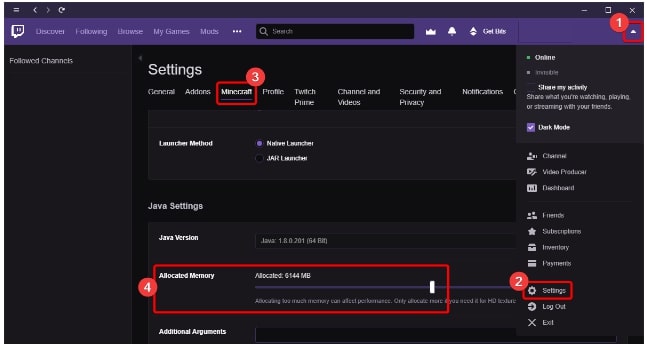
- Set your desired RAM allocation amount with the Allocated Memory slider.
- This will automatically save your changes. Wait a few seconds before going back to the main launcher interface.
Allocate RAM Using The Legacy FeedTheBeast (FTB) Launcher
Finally, we will discuss the FTB Minecraft launcher. The FTB launcher is the easiest launcher to use for changing gameplay settings, so if you’re using it, you’re in luck.
Here’s how to do it.
- Open the FTB launcher and go to the Options window by clicking on settings.
- Locate the RAM Maximum slider.

- Now adjust the RAM allocation for Minecraft using the slider.
Conclusion
In this post, I’ve explained the 5 most effective ways to allocate more RAM for Minecraft and hopefully, you found these methods useful.
I’ll highly recommend that you follow the instructions (mentioned above) in the correct order and do not overlook any steps in order to avoid problems.
If you have any questions or suggestions regarding this topic, please feel free to leave them in the comment box.
Thanks for reading and have a great day!
Also, Read: 10 BEST Minecraft Base Ideas in 2021


